
Data Center: data sources, manual entry, data tasks, and approvals
The Data Center is a page of its own (left navigation → Team → Data Center, address #/datacenter). It answers three questions: where each kind of data comes from, how often it refreshes, and whether it's healthy right now. For data that can't be fetched, it also answers who fills the gap, when, and with which file.
Settings → Connections only links accounts; the Data Center handles the data logic. Every bulk import now starts from the Data Center — other pages only keep a small Go to Data Center link.
Tip: This article goes in order: read the page → source priority → frequency and Run now → manual entry switch → manual upload schedule → data tasks → upload it yourself → approvals → import center → troubleshooting.
Who can do what
Everyone can open the Data Center, but what they can do differs:
| Action | Founder | Leader | Member | Read-only member |
|---|---|---|---|---|
| View the Data Center | ✓ | ✓ | ✓ | ✓ |
| Change the frequency, Run now, the manual entry switch, "Who can enter", manual upload settings, Keep BigSeller for this shop, edit / delete learned header layouts | ✓ | View only | – | – |
| Dispatch a data task, import directly, Tools, AI review, undo an import | ✓ | ✓ | – | – |
| Upload (needs approval) on file cards | – | – | ✓ (needs view access to that module) | – |
| Enter it myself on entry cards | ✓ | ✓ | When the card's "Who can enter" allows it | – |
| Approve data imports | ✓ | ✓ (Approvals permission level 3) | – | – |
Linking accounts (Connections) needs Settings permission level 4, which is usually the founder.
Step 1: Read the page
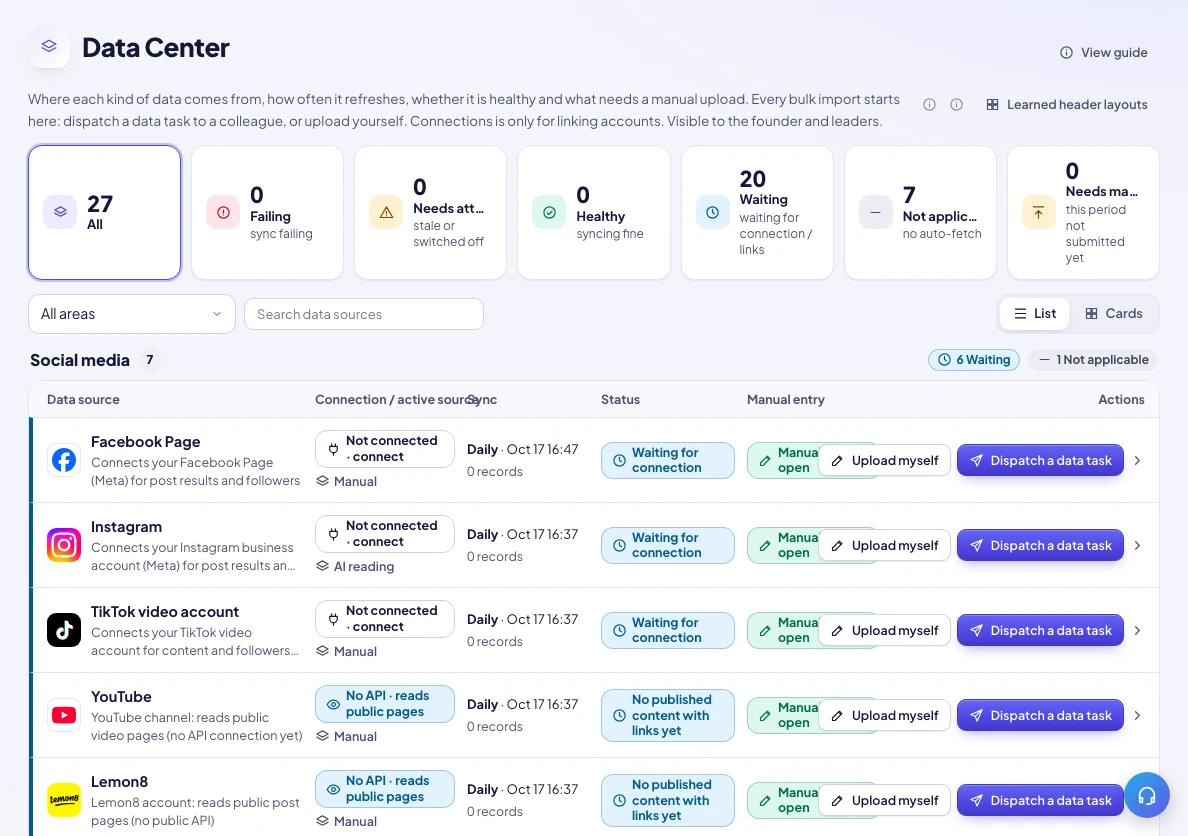
- Summary bar: All, Failing (sync failed), Needs attention (stale or switched off), Healthy, Waiting (waiting for a connection / links), N/A (no auto-fetch), Needs manual data (this period's data not submitted yet). Click a number to show only that group.
- Toolbar: the All areas dropdown (Social media, Marketplaces, Website, Orders, Finance, KOL, LINE, Price monitoring, Products, Office / collaboration), Search data sources, and the List / Cards view switch (your choice is remembered).
- List columns: Data source, Connection / active source, Sync (frequency · last run · record count), Status, Manual entry (switch state + this period's due date), Actions.
- Learned header layouts next to the title: file headers learned during imports (see Step 9). Visible to leaders and the founder.
Connection labels
| Label | Meaning |
|---|---|
| Connected | An account or shop is linked through the API |
| Not connected · connect | Not linked yet; click it to open that tile in Connections (only people who can link accounts see the link) |
| No API · reads public pages | The platform has no open API, so SellerTiger reads public pages (YouTube, Lemon8, X, KOL posts, competitor prices) |
| Manual data | This data can only be entered by hand |
| CSV only | Only report files can be imported (for example, Lazada Affiliate) |
| Needs approval | The API needs the platform's approval; hover for details |
| Saved · test mode | Courier keys are saved, but live booking isn't on yet |
Details window
Click any row to open its details window, which has four parts:
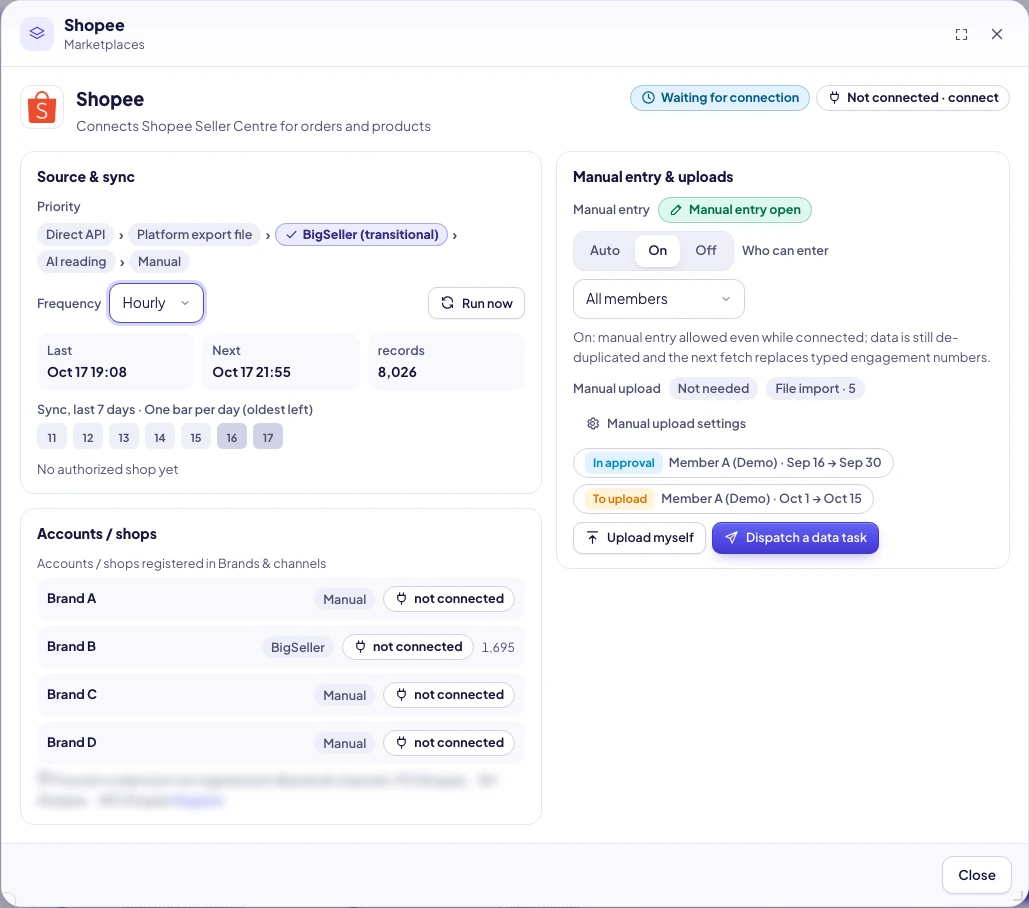
- Source & sync: the Priority chain (the checked one is the source in use), Frequency, Run now, Last / Next run time, record count, the Sync, last 7 days squares (oldest left, newest right; green = healthy, yellow = partly failed / not in your plan, red = failed, blue = feed not available yet, gray = not connected / skipped), the latest result, and n merged automatically (duplicates removed automatically).
- Accounts / shops: one row per account or shop from Settings → Brands & channels, with the status Direct, Connected, Authorized · feed pending, No API, No token, or Expired. On office cards this lists each member instead (Syncing / Waiting for first sync / Expired / Sync error). If orders contain a shop that isn't registered, you see "Found in orders but not registered in Brands & channels" with a Register link.
- Manual entry & uploads: the manual entry switch (Step 4), the manual upload schedule (Step 5), and this period's tasks.
- Tools (leaders and the founder): Match BigSeller SKUs, Import ad data (CSV / Excel), Import affiliate order tags, Import history.
Step 2: Understand source priority
The same data can come from several places. SellerTiger uses the highest available source, from high to low:
- Direct API: the shop or account is connected directly through the API.
- Platform export file: the original file exported from Shopee / Lazada / TikTok Shop Seller Center or the Shopline / Shopify admin. This is the platform's own data.
- BigSeller (transitional ERP): used for shops that aren't connected directly yet.
- AI reading: when there's no better source, AI reads public pages. It uses AI credits and is less reliable.
- Excel import / manual: your own spreadsheets or numbers entered by hand.
Each order counts once. Orders are identified by "platform + platform order number". When a lower source arrives first and a higher source later, SellerTiger upgrades the existing order in place: packing progress, notes, holds, scan history, and KOL attribution are kept, and no second order is created. A copy from a lower source can't be added next to a higher source.
Directly connected shops are skipped. Once a shop's direct connection is live, BigSeller sync and file imports skip that shop's orders automatically, and the import preview tells you so.
Current status: Direct order sync is only live for Shopify so far. After you authorize a Shopee, Lazada, TikTok Shop, or Shopline shop, it shows Authorized · feed pending. Orders keep coming from platform export files or BigSeller, and imports aren't locked.
Keep BigSeller for this shop (founder): check it in a marketplace card's details → Accounts / shops, and that shop keeps BigSeller as its order source even after it's authorized.
Note: For social media data, the order is API > public pages > AI > manual. Reading public pages also uses AI, so if your plan doesn't include AI, the public-page level doesn't run either.
Step 3: Frequency and Run now (founder)
- Open a card's details → Source & sync → Frequency.
- Choose Off, Hourly, Daily, or Weekly (office / collaboration cards offer Every 15 min / Hourly / Daily / Off, with no weekly option). BigSeller's "Daily" is fixed at 06:00 Bangkok time.
- To see results right away, click Run now. While the job is running, it shows Running; check back shortly.
Default frequencies:
| Data | Default |
|---|---|
| Direct shop orders | Hourly |
| BigSeller (products → inventory → orders → settlements) | Daily at 06:00 |
| Social media data, followers, LINE friends and broadcast results, competitor prices, KOL posts | Daily |
| Courier tracking | Hourly |
| Office / collaboration (Lark, Google) | Every 15 min |
SellerTiger checks for due jobs every 5 minutes and runs them one at a time, never two at once. If a module isn't in your plan, its frequency is locked and the card shows "Not included in the current plan". Setting an office card to Off pauses Lark / Google fetching for the whole company (members see "Paused" under their connected accounts).
Health status
| Status | Meaning | What to do |
|---|---|---|
| Healthy | Recent runs succeeded on time | Nothing |
| Waiting for the first sync | Connected but hasn't run yet | Click Run now |
| Waiting for connection | No account / shop yet | Click Not connected · connect |
| Connected, but auto-fetch is off | The frequency is "Off" | Pick a frequency |
| Stale | No successful update for more than 2× the frequency | Check the latest result, fix it, then Run now |
| n failures in a row | Failing repeatedly; hover for the reason | Usually you need to re-authorize in Connections |
| Authorized — direct order feed not available yet | The shop is authorized, but the platform's direct connection isn't live yet | Keep using export files or BigSeller |
| Not included in the current plan | Plan limit | Upgrade your plan |
After 3 failures in a row, people with Settings permission level 4 get a high-priority notification: "Auto-fetch failed n times in a row: …".
Step 4: Manual entry switch (founder)
Manual entry is only for data that can't be fetched. Once a real source is connected, turn it off so the same number isn't entered twice.
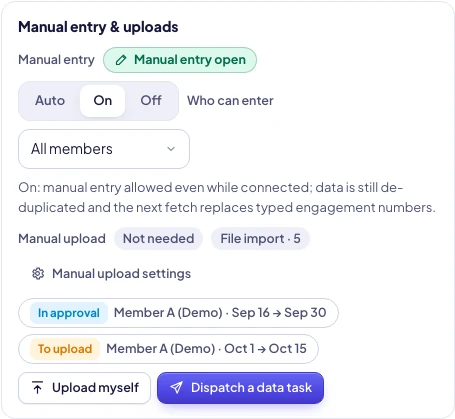
- Open the card's details → Manual entry & uploads → Manual entry.
- Pick a mode:
- Auto (default): closes automatically when this card's API or ERP source is connected, and stays open when it isn't. Marketplace cards only close once direct orders are actually flowing; being "Authorized" alone doesn't close them. Public-page links (KOL posts, competitor prices) don't count as connected.
- On: always open. Duplicates are still removed automatically, and the next fetch overwrites hand-entered engagement numbers.
- Off: always closed.
- Pick Who can enter: Founder only, Leaders and above, or All members. Defaults: social media, KOL post links, and LINE OA are All members; other cards are Leaders and above.
- Check the status label: Manual entry open, Off, or Auto-closed.
When it's closed, every manual entry point (imports, data tasks, entry forms, and hand-entry fields on module pages) refuses input, and the page shows "Synced automatically · source · time" or "Manual entry is closed in the Data Center". Leaders can see the mode but can't change it.
Step 5: Manual upload schedule (founder)
For data with no API, you can set "how often to submit and which file".
- Card details → Manual upload settings.
- Manual upload needed? How often?:
- Not needed
- Daily: submit yesterday's data, due today
- Monthly: submit last month's data, due by day (1–28, default the 5th) of each month
- Custom: Days per period (2–90, default 7), Due days after the period ends (0–30, default 2), First period starts on
- Import format: only the formats this card can use are listed (for example, Shopee order export, income report).
- Export guide (shown to the employee): explain where to export from. You can use
{from},{to}, and{period}to fill in dates automatically. - Optional: check Leaders' own uploads also need approval (not the founder).
- Save. The card shows this period's status: {period} imported, {period} data not imported, … · overdue, dispatched to …, … submitted, awaiting approval, returned to …, and due ….
"Imported" is decided automatically: an approved task, a successful import covering those dates, or the data already being in the database — any one is enough. SellerTiger doesn't send reminders or dispatch tasks automatically; overdue is only a status on the card, and a leader decides who to assign.
Step 6: Dispatch a data task (leader / founder)
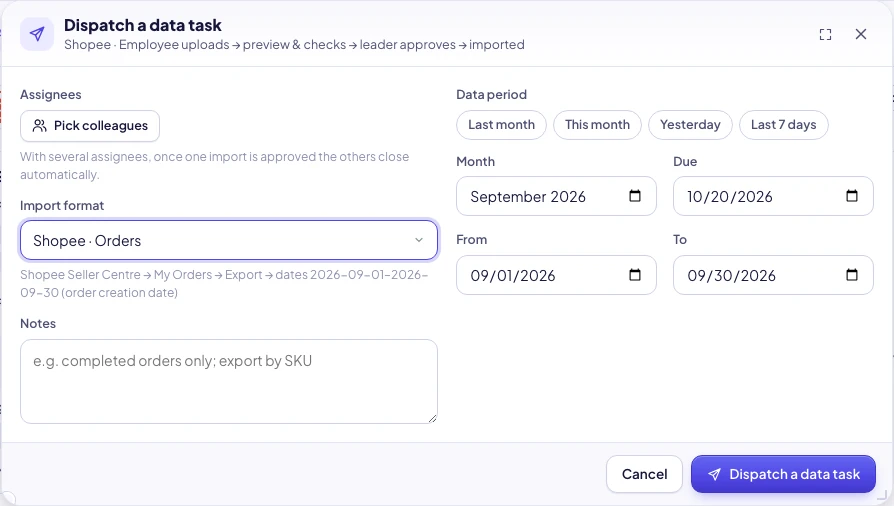
- On the card, click Dispatch a data task (you can also open Data tasks from the Tasks page).
- Assignees / Pick colleagues: up to 10 people. When you assign several people, once one person's import is approved, the others' tasks close automatically.
- Import format: pick the file type the employee should submit.
- Notes: for example, "completed orders only; export by SKU".
- Data period: Last month / This month / Yesterday / Last 7 days, or fill in From / To (up to 400 days). Due defaults to 3 days later.
- Click dispatch. Each assignee gets a data task plus a pinned "Urgent" task. That task can't be closed by hand; it completes automatically once approved.
Flow: employee uploads → preview checks → leader approves → import. For entry cards: employee fills in the table (or downloads the CSV template, fills it, and uploads it) → checks → leader acknowledges / approves → counted.
Step 7: Complete a data task (employee)
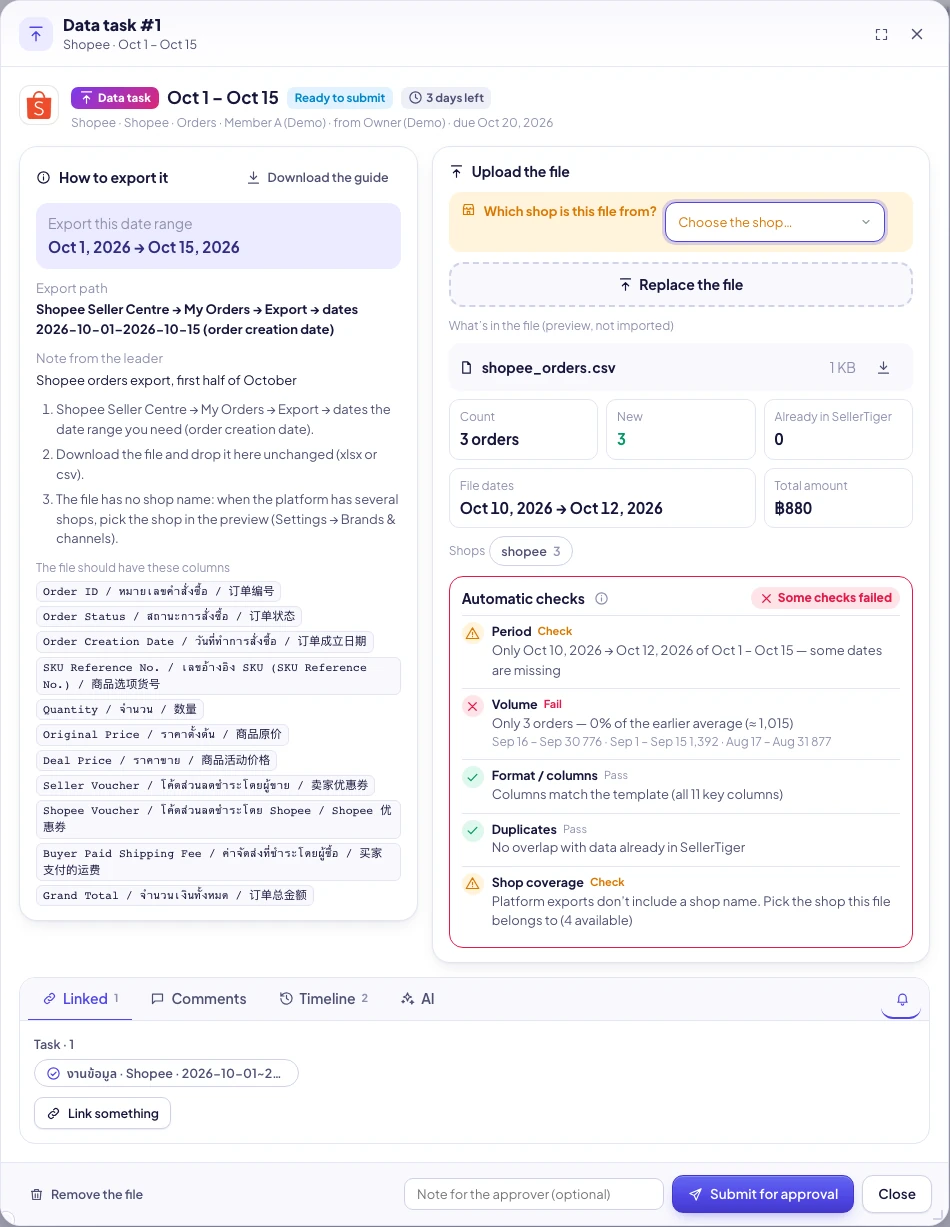
- Open the task (top of your task list, or the task tag on the Data Center card).
- On the left, How to export it: the date range to export, the export path, the leader's note, the steps, and The file should have these columns. You can Download the guide (.txt).
- Export the original file from the platform admin as described, and don't edit the header row.
- Drag it to Upload the file on the right. This step only previews and checks — nothing is imported. If the platform has several shops, choose Which shop is this file from?
- Review What's in the file (preview, not imported): count, new, already in SellerTiger, file dates, total amount, shops; and the Automatic checks:
- Period: whether the dates match
- Count / amount: compared with the daily average of the previous 3 periods; below 50% or above 200% gets a warning, below 20% or above 500% fails
- Format / columns: all the expected columns are there
- Duplicates: the same file, this period already imported, or 90% or more of the rows already exist
- Shop coverage: compared with Brands & channels
- Optionally fill in Note for the approver, then click Submit for approval. If a check fails, you're asked once more: "Some checks failed. Submit anyway?"
- If it's sent back, the task status changes to Returned and shows "Returned: reason". Fix it as described and submit again.
Task statuses: To upload → Ready to submit → In approval → Importing → Imported, plus Returned / Canceled / Undone. The countdown shows "n days left", "Due today", or "n days overdue".
Step 8: Upload or enter it yourself
You don't have to wait for a dispatched task to submit data:
- File cards: click Upload myself (members see Upload (needs approval)). SellerTiger creates a task automatically, and the rest works like Step 7.
- Entry cards (social media data, LINE OA, KOL posts, competitor prices, ads, manual orders, tracking numbers): click Enter it myself and use any of three ways:
- Fill in the table directly;
- Download the CSV template (accounts / links are prefilled), fill it in, then drag the CSV or Excel file back (headers in Chinese, English, or Thai are all recognized);
- Pick a period: Last month / This month / Last 7 days / Yesterday.
- The submit button depends on your role: members see Submit (counts after acknowledgement) on social media / LINE / KOL cards and Submit for approval on price, ad, order, and tracking cards; leaders and the founder see Save & count.
When manual entry is off, the button is grayed out with a lock, and hovering shows why. If a member doesn't have access to the module, they see "You don't have access to this module — ask a leader to assign you a data task".
Step 9: Approvals
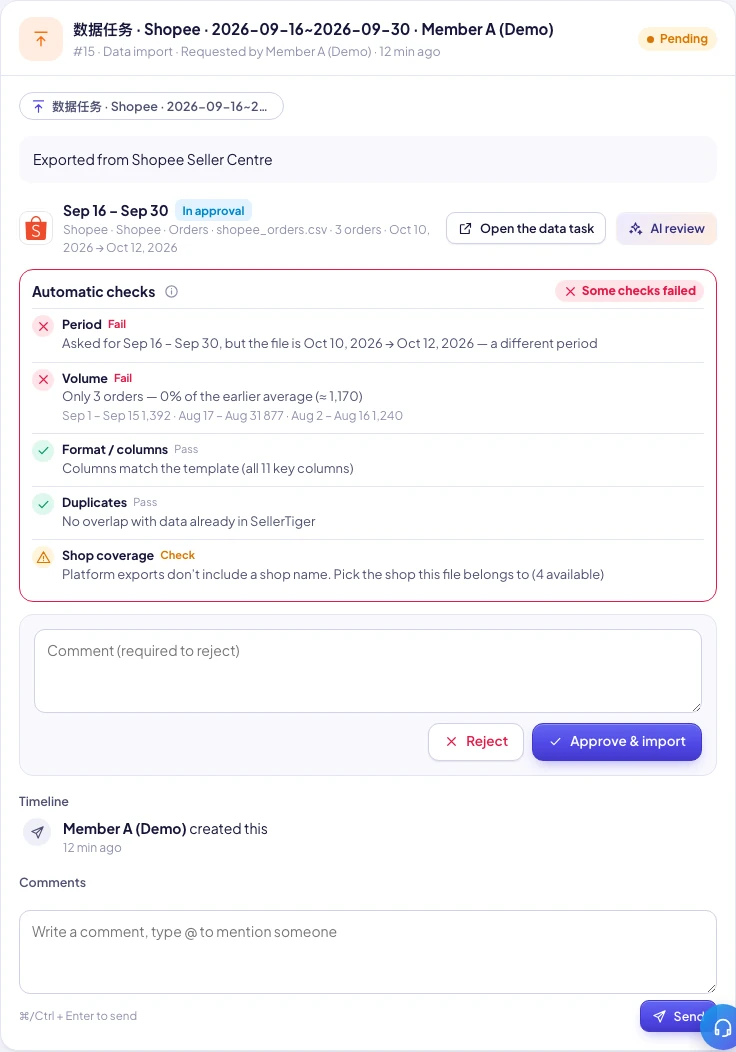
Data import (files)
- The leader opens the "Data import" request in Approvals. It shows a summary and the check results; click Open the data task to see the file preview.
- Optional: AI review (a few AI credits; if your plan doesn't include AI, only the automatic checks run).
- Click Approve & import: the exact file the employee previewed is imported (it's verified to match). When it's done, you see "Approved — the data is imported", and the other assignees of the same task are closed automatically.
- Or fill in the Comment and click Reject (a reason is required to reject): the file is deleted and the task goes back to the employee.
- You can't approve a task you submitted yourself (except the founder). Use "Approve & import" in the approval window, not the generic approve button.
Data entry (acknowledge)
Social media views / engagement / followers, LINE friends, and KOL post data that members enter by hand are saved immediately but marked Pending, and aren't counted in KPIs, charts, or leaderboards yet. Each member gets one entry per card per day.
- Someone with level 3 permission for that module clicks Acknowledge so the numbers start counting, or Return to restore the old numbers and tell the member why. You can also use Acknowledge all.
- Data fetched later by the API, or written directly by a leader, replaces the pending numbers.
Step 10: Import center (leaders / founder import directly)
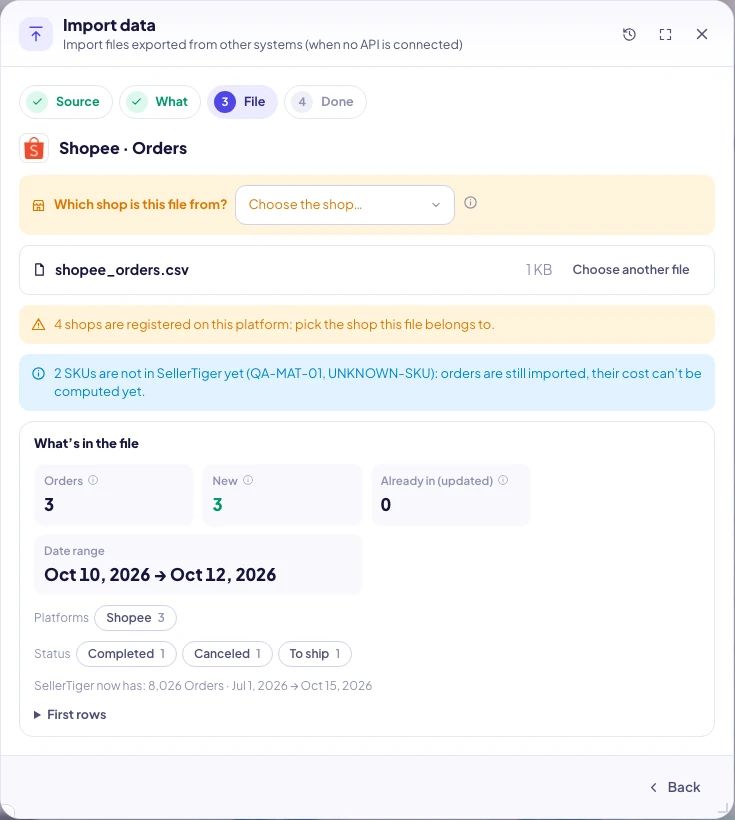
- Source: Marketplace (Seller Center export), Web store, ERP (BigSeller), Accounting (PEAK), KOL / affiliate. When opened from a card, it only shows that card's formats.
- What: read "How to export it from …" and "The file should have these columns". Not sure which one it is? Just drag the file in and SellerTiger detects it.
- File: first you see what's in the file (order count, new, existing ones to be updated, already in from another source, date range, SKU matching, total amount), and nothing is saved until you confirm. Platform export files don't include the shop name, so you're asked "Which shop is this file from?" (picked automatically when there's only one shop).
- Done: or, for people whose imports need approval, Submit for approval.
Where to export on each platform (also listed in the import center):
| Platform | File | Seller Center / admin path |
|---|---|---|
| Shopee | Orders | My Orders → Export (by order creation time) |
| Shopee | Income report (released) | My Income → Released → Income report |
| Shopee | Products / inventory | My Products → Mass Update → Sales Info |
| Lazada | Orders | Orders → Manage Orders → Export all |
| Lazada | Finance transaction details | Finance → My Income → Transaction Overview |
| Lazada | Products / inventory | Products → Bulk Manage → Export (price and stock) |
| TikTok Shop | Orders | Orders → Manage orders → Export |
| TikTok Shop | Settlement statements | Finance → Statements → Export order details |
| TikTok Shop | Products / inventory | Products → Batch edit → Export products |
| Shopline | Orders | Admin → Orders → Order Management → Export order report |
| Shopify | Orders (.csv only) | Admin → Orders → Export → Plain CSV file |
| BigSeller | Orders | Orders → Order Processing → Export → Export by SKU |
| BigSeller | Inventory, product SKUs, discontinued list, settlement details | See the steps in the import center |
| PEAK | Receipts (sales), expenses | See Connect PEAK accounting |
| Affiliate | TikTok Shop affiliate orders, Shopee AMS conversion report, Lazada affiliate report | .csv / .xlsx |
When headers aren't recognized: Match the columns
When a file's headers don't match a known format, Match the columns appears:
- For each column, pick what it is (amount, order number, …). You can click Let AI match them: it only sends the headers and up to 5 masked sample rows, and costs a few credits. If your plan doesn't include AI, pick them by hand.
- Click Save mapping and preview. The header layout is remembered, and files with the same headers are recognized automatically from then on. Remembered layouts are in Learned header layouts (the founder can edit and delete them).
Good to know
- Nothing is counted twice: importing again only updates by order number. Importing the same file again shows "This exact file was imported on … by …", with the option Import again anyway.
- Locked when the API is connected: the card shows Locked · API. Only the founder can Backfill history from before the API (before a date), and the end date must be before the API start date.
- File size: imports up to 120 MB; data task files 60 MB; entry templates 10 MB.
- Previews are kept for 30 minutes: after that, or when many people upload at once, you see "The upload expired — choose the file again". Just choose the file again.
- Plan SKU limit: new SKUs over the limit aren't imported; upgrade and import again.
- Undo: Import history → Undo deletes the data that import added. Data that a later import changed can't be undone.
Troubleshooting
| Message you see | Cause | What to do |
|---|---|---|
| This file isn't recognized. Upload the file exactly as exported (xlsx or csv), without editing the header row. | The headers were edited, there are extra rows above the header, or the format is wrong | Export the original file from the platform again, or use Match the columns |
| Manual entry for this data is closed in the Data Center | Manual entry on this card is "Off" or auto-closed | If an API is already connected, you don't need to enter it by hand; if you really need to fill a gap, ask the founder to set the switch to On |
| This source syncs by API — this period can't be imported by hand | The API already covers these dates | No import needed; the founder can backfill history |
| The backfill must end before the API start date | The backfill range includes dates after the API started | Move the end date before the API start date |
| This exact file was imported on … by … | The same file was already imported | If you're sure, click Import again anyway |
| Pick the shop this file belongs to first | Platform export files don't include the shop name | Pick the shop; if it isn't listed, register it in Brands & channels first |
| The upload expired — choose the file again | The preview is older than 30 minutes or was pushed out | Choose the file again |
| The file differs from the preview — upload again / The staged file is gone | The file changed or was cleared before approval | Reject it and ask the employee to upload again |
| You can't approve your own data task | You're approving your own submission | Ask another leader or the founder to approve |
| Data tasks complete automatically when approved | You tried to close the data task's task by hand | Go through approval, or the person who dispatched it can Cancel the task |
| This data needs an approval: use "Upload myself" in the Data Center | Members can't import directly | Use Upload myself (needs approval) |
| Authorization lost — re-authorize | The shop / account token expired or was revoked | Connections → that tile → Re-authorize, then Run now |
| The platform API returned an error | The platform's API returned an error | Hover for details; it usually recovers on its own. If it keeps failing, contact support |
| AI isn't included in the Free plan. Upgrade to use it | Your plan doesn't include AI | Upgrade, or pick columns / enter data by hand |
| Some SKUs are "Not matched" | These SKUs aren't in SellerTiger yet | Import your SKU master data first, or use Match BigSeller SKUs |
| TikTok order numbers turn into 1.23E+17 | Excel stored the 18-digit order number as a number | Upload the platform's original file; don't open and re-save it in Excel |
Related articles: Connections overview · Connect BigSeller · Connect Shopify
Inside SellerTiger, press the headset button to ask the AI assistant or open a support ticket.