
Connect a Shopee shop (Open Platform · self-developed app)
Authorize your Shopee shop in SellerTiger with your own "Seller In House System" app created on Shopee Open Platform. SellerTiger only reads data. It never changes prices or messages buyers.
Note (checked 2026-10-17): Shopee shop authorization works today, and Test connection reads the shop name. However, the direct Shopee order feed isn't live yet. After you authorize, orders for this shop keep coming from Shopee export files or BigSeller, Data Center shows "authorized · feed pending", and imports aren't locked. When the direct feed goes live, the shop switches over automatically with no duplicate orders.
What you get
| Today | Once the direct feed is live |
|---|---|
| Shop authorization, tokens stored encrypted and renewed automatically, Test connection reads the shop name | Orders pulled automatically (hourly by default); manual entry and imports for this shop are skipped automatically; each order is kept only once |
| Orders / inventory / settlements: use Shopee export files or BigSeller | — |
Before you start
- Who does this: someone with level-4 Settings permission in SellerTiger (the founder by default). On the Shopee side, use the shop's main seller account (sub-accounts usually can't register as a developer).
- Brands & channels: the brand already has a Shopee sales channel under Settings → Brands & channels. Without a channel, Add shop is grayed out.
- Plan: each authorized shop uses one shop slot (manual / BigSeller shops don't). When you run out, upgrade or buy extra slots in Settings → Subscription (฿290 / month per shop, excl. 7% VAT).
- Time: Shopee reviews both the developer and the app (Go Live). Allow a few days.
Don't want to register as a developer? You can register the shop as Manual / BigSeller sync only and bring orders in through BigSeller or Shopee export files. See Connect BigSeller and Data Center.
Step 1 · Credentials: get the Partner ID and Partner Key on Shopee Open Platform
- Sign in at open.shopee.com with the main seller account, click Console (top right) and follow the prompts to register as a developer. Choose the type Seller In House System, submit your company details and wait for approval.
- Go to App List → Create App, set App Category to Seller In House System, and enter the app name (for example SellerTiger) and purpose.
- The app details page first shows a Test Partner ID / Test Partner Key (sandbox only). Click Go Live to submit the app. Once Shopee approves it, the same page shows the Live Partner ID and Live Partner Key (click the eye icon to reveal the key).
- In the app settings, fill in Redirect URL Domain (there are fields for test and live): enter the domain of your SellerTiger address, for example
app.sellertiger.com(see Step 4; you can copy the redirect URL from the SellerTiger window).
What to copy: the Live Partner ID (digits only) and the Live Partner Key. The Partner Key works like a password. Don't paste it into group chats or emails.
Step 2 · Encryption / webhook: not needed
SellerTiger doesn't use Shopee push notifications, so you don't need to set up a webhook or encryption in Shopee.
Step 3 · Permissions: use the Seller In House System defaults
A Seller In House System app can read its own shop's shop, order, product, logistics and settlement data by default. Chat and reviews need extra approval from Shopee, and SellerTiger doesn't use them yet.
Step 4 · Callback: add the shop in SellerTiger and copy the redirect URL
- In SellerTiger, go to Settings → Connections and click Shopee under Sales channels.
- Under Shops to connect (from Brands & channels), click Add & connect next to the shop (or Add shop above).
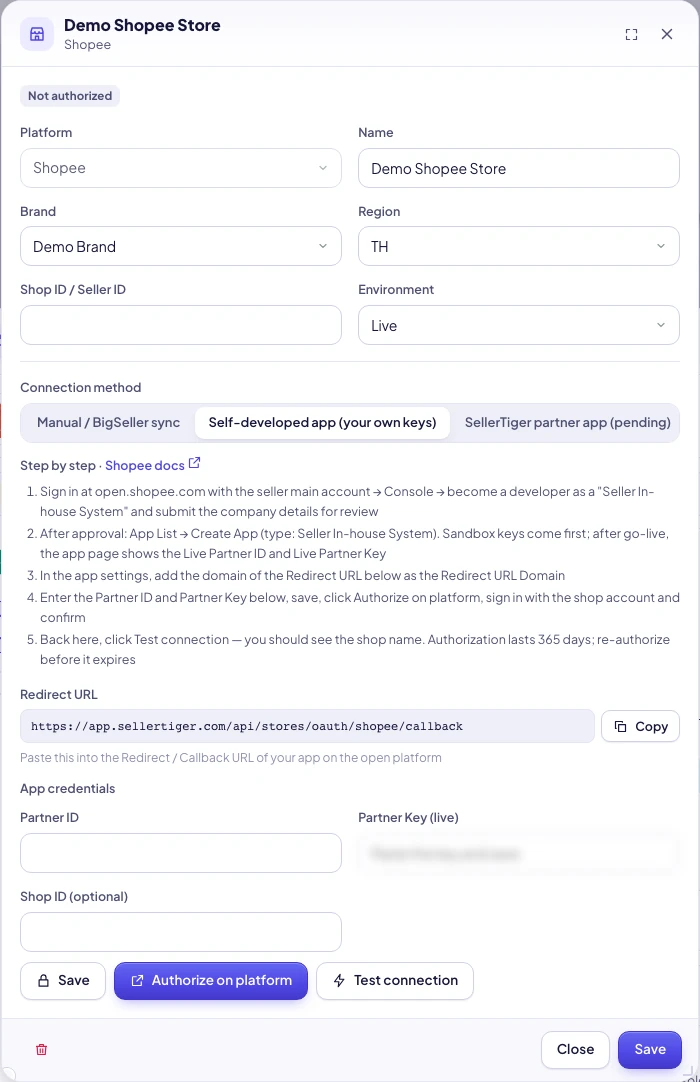
- Fill in Name (for example FG Shopee), Brand, Region (TH) and Environment (Live; choose Sandbox only if you use test keys). You can leave Shop ID / Seller ID empty.
- Under Connection method, choose Self-developed app (your own keys) and click Save first (a new shop must be saved before you can enter credentials).
- Under App credentials, enter the Partner ID and Partner Key (live), leave Shop ID (optional) empty, and click Save (it shows "Saved (encrypted)").
- Copy the Redirect URL shown below:
https://app.sellertiger.com/api/stores/oauth/shopee/callback. Make sure its domainapp.sellertiger.comis entered in the Redirect URL Domain of your Shopee app.
Step 5 · Authorize: approve on Shopee
- In the same window, click Authorize on platform. Shopee's authorization page opens in a new tab.
- Sign in with this shop's seller account and confirm.
- You return to SellerTiger automatically with "Shop authorized", and the shop shows Authorized and "Token valid until …".
Finish within 30 minutes of clicking Authorize on platform. Shopee's own sign-in page is only valid for a few minutes, so sign in right after it opens.
Step 6 · Turn on sync: check and bring the data in
- On the shop row, click Test connection. "Connected" with the shop name means it worked.
- Open Data Center → Marketplaces → Shopee: the shop shows authorized · feed pending (it changes to direct once the direct feed is live).
- Until the direct feed is live, import Shopee export files as in step 10 of Data Center (My Orders → Export; My Income → Released → Income report), or use BigSeller.
Tokens and renewal
- The access token lasts about 4 hours and SellerTiger renews it automatically. The shop authorization itself lasts 365 days; before it expires, click Re-authorize on the shop.
- If you change the Partner ID or Partner Key, the old tokens are cleared and you need to authorize again.
- Revoke: revokes the tokens. SellerTiger stops reading this shop through the API, the slot is freed, and you can authorize again at any time.
Troubleshooting
| Message you see | Cause | What to do |
|---|---|---|
| Partner ID must be numeric | The Partner ID contains letters or spaces | Paste only the numeric Live Partner ID |
| Some required fields are empty | The Partner ID or Partner Key is missing | Fill in both and save |
| Not configured yet — fill in the credentials first | The connection method is still "Manual / BigSeller sync", or the credentials weren't saved | Choose Self-developed app, save the credentials, then authorize |
| Credentials saved — next, click Authorize on platform | You clicked Test before authorizing | Click Authorize on platform first |
| Shopee page shows a redirect / domain error | The Redirect URL Domain doesn't match your SellerTiger address | Enter app.sellertiger.com in your Shopee app |
| Authorization expired — please try again | You came back more than 30 minutes after clicking Authorize | Click Authorize on platform again and finish promptly |
| Platform authorization failed | Shopee couldn't issue a token: usually test keys with "Live" selected, or a partially copied Partner Key | Check the live keys and environment, save again, then authorize |
| The platform returned an error · (followed by Shopee's error and message) | Wrong signature or token | Copy the Partner Key again (no spaces), save, then re-authorize |
| Couldn’t refresh the platform connection. Authorize it again | The authorization expired or Shopee revoked it | Click Re-authorize |
| Can’t reach the platform | Network issue or Shopee is temporarily unavailable | Try again later |
| You’ve reached your plan’s limit of authorized shops | No shop slots left | Upgrade your plan or buy extra shops |
| SellerTiger partner authorization isn’t open yet — use Self-developed app | You chose "SellerTiger partner app (pending)" | Switch to Self-developed app |
| This brand has no such channel turned on (Settings → Brands & channels) | The brand has no Shopee sales channel | Add it in Brands & channels first |
| That shop already exists | A shop with the same name is already registered | Use another name, or edit the existing shop |
SellerTiger partner one-click authorization
SellerTiger is applying for Shopee partner status. Until it's approved, "SellerTiger partner app (pending)" can't be used. Once approved, you won't need to register as a developer. Just click to authorize.
Inside SellerTiger, press the headset button to ask the AI assistant or open a support ticket.